DRAUGHT PROOFING DOORS & WINDOWS

Authentic beech wood perimeter seal with silicone seal to prevent draughts. The draught profile has been specifically developed for inward and outward opening windows and doors. And is mounted on the frame in the reveal.
Do you have monumental frames? Then this surface-mounted profile is a perfect fit. The beech wood can also be easily painted in any desired colour.
Description
- Beechwood profile
- Silicone seal
- Quick and easy to install
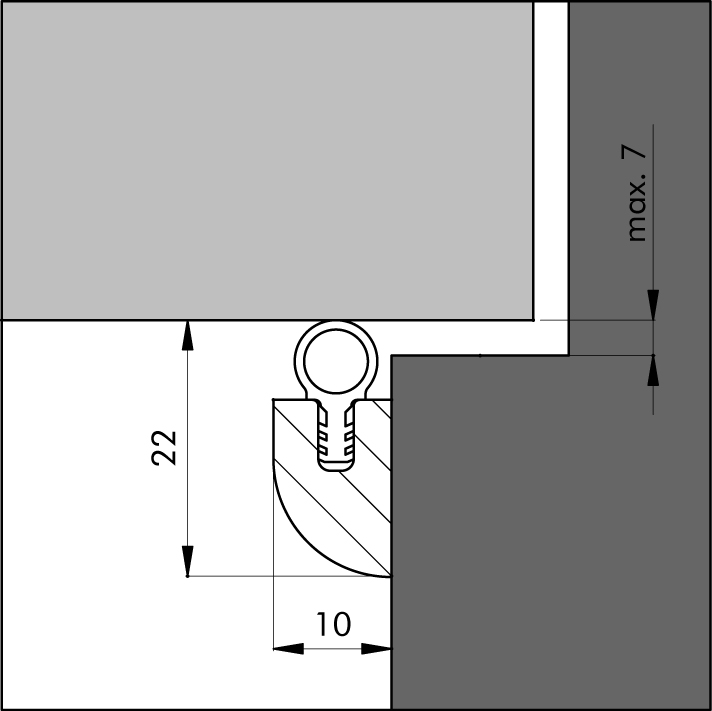
- Sealing for gaps up to 7 mm
- Can be used for monumental frames
- Can be painted over
- Application: inward and outward moving doors and windows
- Can be cut to length
- When painting, the seal can be pulled out of the profile and easily replaced when the paint has dried.
Technical details
- Max gap: 7 mm
- Width x height: 10 mm x 22 mm
- Mounting on the frame
- Ellen nails ø1.6 x 25 mm. Use stainless steel nails for outdoor use and galvanized nails for indoor use
Note: always pre-drill the profile first!!
Specifications
All standard lengths can be cut to size
| LENGTH | ART.NR | COLOUR | EAN (PC.) | UNIT |
| 230 cm | 090000223 | Beech | 8711286159833 | 10 pcs./tube |
Note: It is possible to purchase the wear strip individually at your local hardware store or home improvement center.
Installation advice
Draft can easily be stopped by correctly mounting the beech perimeter seal. Read the supplied mounting instructions and follow the step-by-step plan.
Prepare the necessary materials in advance:
- Tape measure or folding rule
- Pencil
- Wood saw and file
- Drill
- Hammer
Step-by-step guide: installing wooden perimeter seal HTS
- Measure the width of the frame to determine the length of the perimeter seal.
- Mark the correct length on the profile.
- Saw the profile to size.
- Rasp off any sharp edges that may have formed from the wood.
- Pre-drill the profile.
- Close the door. Place the surface-mounted profile in the jamb of the frame and nail it in place.
Note: Place the profile against the closed door with light pressure so that it seals the gap over the entire length.
Related products


